Don't miss these amazing giveaways and newest tutorials!


7 days of giveaways! 7 amazing prizes equaling more than $130!

Photo book to benefit Zoo Atlanta Giveaway! (ends 3/11) (GIVEAWAY CLOSED)

Cute quick organization jars Tutorial

****Shopping Cart Cover Tutorial!****


Showing posts with label Tutorials. Show all posts

Saturday, March 5, 2011

Organization is Key...{ Tutorial }


I am a creature of habit. And my habit is to leave needles and bits and pieces everywhere. With a now walking 1 year old that is just not possible. 

Our town just got a dollar tree. No more 30 minute drive for this momma! So I had to visit. While I was visiting I saw these containers and I just knew I could use like 50 of them. But I restrained myself and bought 3. 

How is that for self control?!

Supplies- 

one or two or three or 50? of these fancy plastic jars with lids
hot glue gun & glue
Old pair of maternity jeans that you hated
 Wide Ribbon
Card Stock


First we start by measuring our containers and cutting out a piece of jeans (or other material ) to size. You want it to go from the very bottom to the top and than cover two sides as well. (sorry for the lack of photo)

Than put a strip of glue on the end and push down, repeat on other side. Make sure you keep it straight! Trust me you don't want to have to re-do that. 


Now you should have this...


Cut your ribbon to the same width and using dots on the two corners glue on top of the jeans in the middle like so... (repeat on both sides)


Oooo Ahhhh! How pretty! But wait... we aren't done yet! 


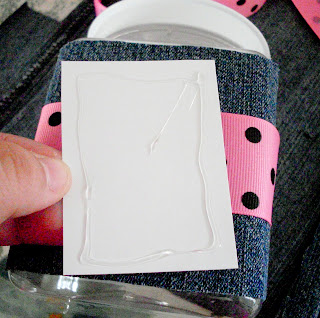
What kind of organization queens would we be without labels?! I did mine real quick in photoshop. But you can use any writing or image editing program. Print on CARD STOCK! This is important because if you use regular computer paper the glue shows through and it is just a mess. 


Put glue all the way around ...


While your doing this chase down your bug that just stole one of your jars. 


Glue to the approximate center on the ribbon on the front of the jar. 

YOU'RE DONE! 


See that was easy wasn't it? 


I did all three of mine in 30 mins. Which included chasing bug down for my containers as he stole them. 


Now go make you some pretty containers! Be sure to send me photos so that I can see what you did or upload them to our facebook page 

Linking it up to a few parties :


monogram

Thursday, March 3, 2011

Absentee blogger

I have been an absentee blogger this week. But I have been working diligently to get my new business off the ground, get together the 7 days of giveaways that will begin next week, and my son has had some appointments as well for his eyes. 

We are going today on a 2 hour trip to his new eye doctor one of the top pediatric ophthalmologist to see what they are going to do about his eye that likes to cross off and on. 

I think that bug would look so cute in glasses! 

Tomorrow I should have up a new tutorial. All of you that love to organize will love this one! 

Monday, February 21, 2011

Bug's everywhere!

Just in case you missed it here is my post from the thrifty birthday party for my son that I guest blogged about over at Ready, Set, Create! head on over there and give Aleesha some buggy love for letting me be apart of her amazing little corner of the web.

__________________________________________

Being a single parent is not easy, and sometimes I get overwhelmed having this tiny person depend on me and only me 24 hours a day, 365 days a year. . But when it comes to planning a party I shine! So when my son's (bug)  first birthday started getting close (okay maybe it was 4 months ahead of time) I started planning how to do the party the cheapest way possible, to accommodate my budget, while not compromising the greatness of the party. 

I did a entire 1st birthday party for 48 people (38 were able to come) in well under $100!

So how'd I do it? Easy! 

-Made the cake myself ($22.76)

- Made all the decorations in photoshop & printed on cardstock I already had ($0)

-Purchased the invitations using codes for % off and free codes on Shutterfly.com ($.85)

-Did 16 goodie bags by going to the dollar tree, and clearance sections of wal-mart.($12.54)

The most expensive part of the whole thing was food which ended up costing around $52.00 for 38 people and we had some left!

Total party cost: $88.15
 for a party for 38 people... (we planned for 48 though)

Think that is impressive? I did my entire mistake wedding for $600 and it was amazing! 
(that included my dress & food)

Want to see photos? I know you do! 

(All photos were taken by an amazing photographer Jebbica @ Photos By Jebbica the ones that do not have her copyright were originals I edited ,graciously given to me because we forgot to grab snap shots with other cameras on the party...oops... lesson learned!)


16 little gift bags for our tiny guests...

In the bags-
bouncy balls, plastic bug, candy hearts, gummy works that we put in clear plastic bags left over from another party. 


Meat and cheese tray for food along with a fruit tray and some chips.


Cake:
4- 9inch double layer cakes 
dyed icing with gel color
Foam board to set it upon

I used a fork to "stab" the icing to make it a fuzzy caterpillar!


Dirt bowl- Crushed chocolate teddy grahams & gummy works thrown in...Big hit with the kids!


Banner- 8x10 cardstock made in photoshop using simple shapes and text

(thrifty wrapping with brown paper by my friend Emily)

(we had streamers from the dollar store going from our chandelier to each corner of the window and the banner on the window is made of cardstock )

Birthday boy


We even set up a tent tunnel for the kids to play in! Bug obviously thought it would be great to push my nephew through it. 


The cake was Bug Approved!


Awesome right? 

Don't forget to come visit me for tutorials, crafts, life, and more over @ The Bug Creator or on facebook

Thanks Aleesha for having me over! 

Friday, February 18, 2011

Shopping Cart Cover Tutorial

I love shopping cart covers! They not only protect your little one from germs but they can be stylish buggy accessories! Okay maybe not... but that germ protection is reason enough to love them right? 

A friend of mine approached me and asked if I could make one for her son. Her significant other did not want one of the "girly" cart covers out there with the floral prints etc... He wanted MANLY! So we did manly L.A. Lakers style! 


While I was in the process of trying to figure out whether I wanted to wing it myself or wimp out and buy a pattern someone suggested turning it into a tutorial. So... I did! 

Here ya go! Enjoy! (tutorial after the jump)

Thursday, February 17, 2011

Yep I'm such a tease!


Don't Forget these GREAT offers!

$50 CSN stores gift card giveaway! Low entries, ends 2/20

Parents Palooza tickets giveaway for our Atlanta Local Readers! ends 2/20


_________________________________

I finished it! 

The tutorial is 2 steps & and a few edited photos away from being finished as well! 

Thanks to my fantastic customer Carrie for being my test dummy. I can't wait for her to receive it! 


Check back Saturday!

Tuesday, February 15, 2011

Guest blogging @ Ready Set Create

I forgot to mention... I am guest blogging today! At Ready, Set, Create

It is all about my thrifty birthday party and has party pictures too! 

Make sure to head on over and check it out. 

Not just lazing around...

Have you entered the giveaways? 

$50 CSN stores gift card to use in any of their 200+ stores! 

2 sets of 4 tickets to parents palooza in Atlanta! 

_______________________


I am so excited about the new tutorial I have been working on for you guys!
 I have been working on making a cart cover tutorial that is easy. 

I was going to make it my first ever pattern but I thought about it and said to myself, "Heck no!" 

So expect it towards the end of this week as it is almost finished. :D 


And just so you don't think that I am being lazy and not doing ANYTHING let me introduce you to my new found love of... KNITTING! 

(flower)

(hat for my bug)

And here are some adorable knickers I made for him while testing a pattern for Little Lizard King Patterns.


Yep I promise I am not just lazing around! 

Friday, February 4, 2011

Don't FORGET!!!


Today is the final day to enter the little lizard king pattern giveaway

There are two handfuls of entries so your chances are great! 

Giveaway ends tonight at midnight! 

Need some valentine inspiration? Check out my valentine shirt for bug. 

Future post:

What would you paint with this color paint? I need some ideas! It can be anything you can use wall paint on (besides a wall because well i don't have a wall I can paint)


Wednesday, February 2, 2011

Be my Valentine

Don't forget to check out the sewing pattern giveaway and enter! It ends friday! Tell your friends even if you don't want to join. They might love it!

In the past I haven't been much of a Valentine's day girl. I have the unfortunate luck of either breaking it off or just not having anyone for V-day. Not complaining though! I am not much for commercialized holidays anyway. However I have my little man this year and he is the only man for me.

I saw an adorable shirt in wal-mart the other day that said Eligible Bachelor. But I did not like the cheesy bowtie thing on it. Kind of made me cringe at the attempt to be cute. So I did what any other crafty momma would do. I came home and made my own shirt! 

Hope this provides some inspiration...


Bachelor for the side (only thing I wish I did here was make the letters go up the side so that you had to tilt your head to read it... Know what I mean? B at the bottom. Okay hope that made sense) 


My bug wears his heart on his sleeve. 


Shirt- $3 wal-mart
On hand- freezer paper, fabric paint, iron, adorable child. 

Total Cost: $3

How to: I used photoshop and combined images to make the heart with the arrow. I than chose a font that I liked off of dafonts.com. I printer both images out directly onto (the paper side) freezer paper that I cut into 8x10 sheets. 

Cut out the images with an exacto knife on a cutting mat (so that you don't mess up your table). Grab up fabric paint of your choice and your iron. Iron the freezer paper onto your shirt on a low heat setting.

 Once it is all sealed apply fabric paint liberally or not so liberally if you want a distressed look. Put in a location where little fingers cannot grab it and let it dry over night. Peel off freezer paper and enjoy! (don't forget to use a pressing cloth once it is dry and iron the fabric paint to heat set it)

Enjoy! Have a awesome V-day!


Sunday, January 23, 2011

Thrifty Changing Mat Tutorial

So I might be am cheap.

Because I am and due to the fact that my son and I were in tight spaces I had to let go my dreams of a beautiful white changing table and matching crib. -tear- His changing table? The top of his dresser. I never really found the need to buy a 30 dollar changing mat when I could just as easily use a cushy towel. 

So a towel we have been using. But now that I have a room for him and I am trying to decorate said room the towel just looked tacky! A quick cover was in order. 

I decided to share this thrifty changing mat with my fellow crafty momma's ! This can also work for a regular changing mat! 

& because I decided to turn this into a tutorial before I started... 

Supplies: 

Fabric to fit the size of your towel or changing mat (Approx 3/4 yard)
Sewing machine
Velcro

Step 1:
You need your towel folded however you want it to fit onto your table. 
(I fold mine in half long ways and than in half again so that it is a neat little rectangle.)

Step 2:
 You can need to cut your fabric length and width of the towel adding 1/2 inch all the way around. (you don't want the fabric too tight to your towel or changing table cause it may bunch it up) 

Step 3:
With right sides facing together sew 2 short and one long side of your fabric rectangle. Leave one long side open to add velcro so that you can wash your mat/towel cover!

Step 4: 
Cut velcro for the same length as your open long side! (hem your fabric on that side by 1/4 inch if you have a fraying fabric. I used knit so I did not need to hem)

You should have something like this now:


Step 5:
Pin your velcro down to the very edge of your hemmed (or not hemmed knit) fabric as pictured below...


Step 6: 
Sew your velcro down unpinning as you go. 


If you end up with some snags like this... Don't freak out! It will be hidden anyway ! 


Insert towel... velcro closed... and TA-DA!


Your finished! Pat yourself on the back for a job well done! Simple right? 

WARNING: This mat is not equipped with buckles. As with all mats and changing tables children should never be left unattended. Do not take your eyes off the little squirmy for ANYTHING! I am serious here folks! This mat is also not secured to the dresser do not forget that! This mat is not made for sleeping. It is too soft and your child can suffocate if left unattended on it. Even on the floor! 

Thanks for using my tutorial for PERSONAL USE ONLY! :D

Related Posts with Thumbnails