

Welcome to National Sewing Month!!!
National Sewing Month is celebrated for the entire month of September! So for the month of September we have some exciting things going on around here!
For one we have a giveaway at the end of the month! What are we giving away? Sorry can't tell! It's a surprise!
There is going to be a new tutorial once a week on Wednesday!
I will be guest blogging over at Seven-Thirty-Three & at Keeping It Simple!
It is going to be a crazy month folks!
Don't forget to check out what is going on over at No Big Dill w/ Katy... She has some awesome ideas and plans!
_________________________________________
So let's get down to our first tutorial... Today we will be sewing the absolute essential piece to any babies car seat!
Strap cozies!


{This tutorial is continued under the "Continue reading" so that this blog can be more reader friendly to those who have slower connections}
My son had some strap cozies.. you know the ones with the giant animal head (see photo below)? Well he hated them. They rubbed his poor little cheeks... So I decided that it was time to make some new ones!

Supplies:
2 coordinating fabrics (Just forget that that multi colored block one is there)
scissors(or cutting mat and rotary cutter)
fabric marker
pins
sewing machine
Iron
Quilt batting (I used low loft and just did two layers)
Old strap cozie that used to work OR you can use my measurements!

{SAFETY NOTE: I used an old cozie because if it is too big for your carseat than your carseat will NO LONGER BE SAFE! Your cover should start where the strap meets the car seat and end at the chest harness right above the arm pit level of your child. Measure..measure..measure! That is all :D}
So we start with one of our fabrics... (this is an old baby blanket) and you want to lay your cozy down and trace it leaving a good size seam allowance... I aimed for 1/4 inch but I am sure it was more like 1/2 inch!
(What can I say? I am not perfect :P)
(Final measurements for my product were 6 1/2 inches x 5 inches when sewn together... don't forget to leave a seam allowance!)

Cut out 2 of your outline making sure you have rounded corners (not necessary really but it is pretty)
Now lay your previously cut out square on top of your other fabric and cut 2 pieces again.

You should now have 2 pieces of each fabric!

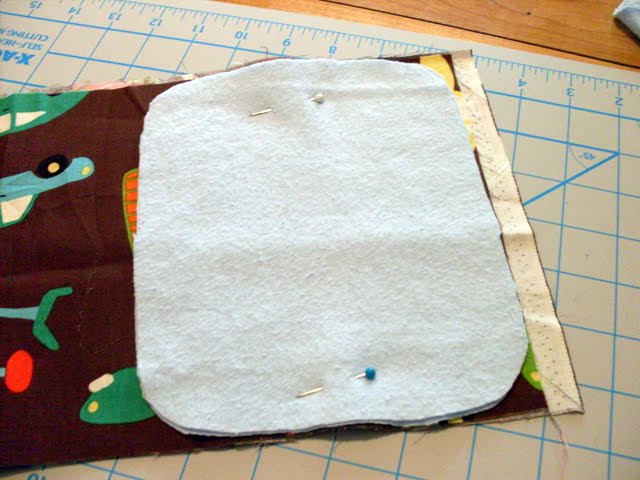
Next pin to your quilt batting and cut out... I used two layers of low loft quilt batting!

Here is your batting :D

Sandwich your layers like this... Batting, Fabric 2, Fabric 1.

Right sides of the fabric should be together.

Pin it all together (including your batting)

& sew with a straight stitch {or serge if your fancy}... batting side up! Do not forget to leave a space for turning!
(1-2 inches depending on how experienced you are)
{NOTE: Sometimes your batting might get wrapped around your foot edge and start to pull if this happens don't worry! Just stop needle down, take your scissors and snip! It will all go back into place easy peezy!}

Now turn it all right side out after you take your pins out!

You should have this... ew look at all the wrinkles! :P

Pin your opening shut the way you would sew it...

Get out your handy iron and press these babies pretty!

When I say press I mean take your iron turn it on let it heat up... than press!
Don't move it back and forth because this can use the layers to shift and it takes forever to fix all that mess once its ironed the wrong way!

Look at how gorgeous it looks now!
Okay enough oo'ing and aah'ing!
ON TO THE SEWING MACHINE!!!!

Now we are going to top stitch.
{NOTE: Remember to REMOVE your pin when you get to it ... If you sew over it and hit it with the needle one or both could break and cause damage to your machine and possibly even YOU! No really I am not kidding... think needle in the eye...}

Now that we are all top-stitched we are going to quilt these babies!
{This is optional but it makes it look a lot better!}

This part is easy... and trust me quilting like this is not hard at all! Just sew straight lines back and forth...
What I did was started on one side sewed across to my top stitching line than with the needle down turned so that I was on top of the top stitching line and sewed how far I wanted to space than with needle down again sewed back across the pad... and repeat!
(Did this make sense?)

Now fold it to the width of your straps on the car seat
(measure for this on your own seat... or take a guesstimate!)

& pin in place

The other side should look all cool like this!

Get out some snaps (or you can use tiny velcro squares) And apply per the snap instructions!
Make sure you use a fabric marker to mark where you need your snaps!

And presto! OH SNAP! It looks so good!

Finish the other one and you have a set!

Now go stick those beautiful creations on your tiny loves seat and enjoy!
Bask in the fact that yes you did make those and yes they are going to love them!
(This tutorial is for PERSONAL USE ONLY! No commercial use allowed!)
Oh and don't forget to upload pictures of your finished project to our
BRAND SPANKING NEW..... Flickr Group!
P.s. it is 11:38pm on August 31st... I just now finished this... PHEW! I made it! :P
Linking to....


2 comments:
What a GREAT. IDEA!!!!! Love it!
Thanks for linking to my Sew 5 Challenge! :) You are fast!
Post a Comment