
My apologies to the folks @ Google for bad mouthing their program for their my mistake.
Now to show my deepest regret... a post all about PICASA!
Oh Picasa how I love you! You make my photo blogging life so much easier.
Even if you did cause me to scream… & cry that one time.
Do you upload your photos to blogger... one... painful photo at a time?
Do you hate it when the up-loader won't work and in order to make it work you have to, strip to your undies, shake your butt 3 times to the north, while hopping on one foot, singing the anthem (Mexican, of course) backwards, & licking a leprechaun?
Yeah I hated that too...
And than I discovered... {insert singing angels here} PICASA DESKTOP!

You can edit, copyright stamp, and upload all in one program! There is even a option to open your photo in picnik to edit and than have it save directly back to your hard drive.
And... it uploads straight to your blogger album so that sweet little insert photo link is no longer a waste of time.
Here's how to get started and some MUST knows.
{click images to enlarge}

1. Go to www.picasa.google.com and click the Download Picasa 3.8 button... Save to your computer...Open... & Install...
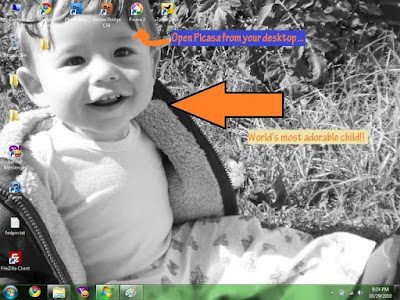
2. (yeah he is adorable... :P) Click the link on your desktop to open the program

3. First we want to put folders in picasa so that we have photos... so to do this we click file and than Add Folder to Picasa.

4. Find the folder where your photos are (in my case I have all photo folders on my desktop) and click SCAN ALWAYS. MAKE SURE THIS IS CLICKED! What does this do? Well whenever you open picasa it automatically uploads new pictures from your folder. That way you don't have to do this again, and again, and again.

5. Now that you have your photos double click a photo of that adorable child... or product. :P And you will be in the "edit" menu. You can add a copyright, edit in picnik, do light and exposure changes, etc...


6. After your done playing with the photos highlight by clicking while holding ctrl down to select the photos and click upload!

Your blog name (because you already signed in using your blog) should be in the album list... Or you can make a entirely new album ! Works either way... I always do 640 pix for size to upload to save space and make sure that people don't get high quality photos of my child. Click UPLOAD!
Easy right? Now when you go into blogger you just click the add photo button click this blog or "from picasa web albums" if you made a different folder. Add your photos and presto! You have an uh-mazing blog post!
Warning though....

NEVER... and I mean NEVER right click and folder to remove it from picasa and instead of clicking "remove from Picasa" click DELTE FOLDER. It deletes it from your hard drive and not in a go to the recycle bin so you can retrieve it way... No it's done.. as in forever... see the "crying post" mentioned above. I am scarred.
Hope you enjoyed my picasa tutorial... Please be sure to share with your friends and family!
P.s. another great thing about picasa is no bandwith limit like photobucket! So no monthly fees! Just a memory limit and if you get close (I have like 1000 photos and I am not close yet) you can buy more memory for a song! (cheap) & it is a yearly fee not monthly.
No comments:
Post a Comment